
Jumper knee, also known as patellar tendonitis, is a common overuse injury that affects athletes, especially those involved in sports requiring frequent jumping, such as basketball and volleyball and anyone who puts a lot of stress on their knees.
This article aims to provide insight into the causes, symptoms, and treatment options for this condition.
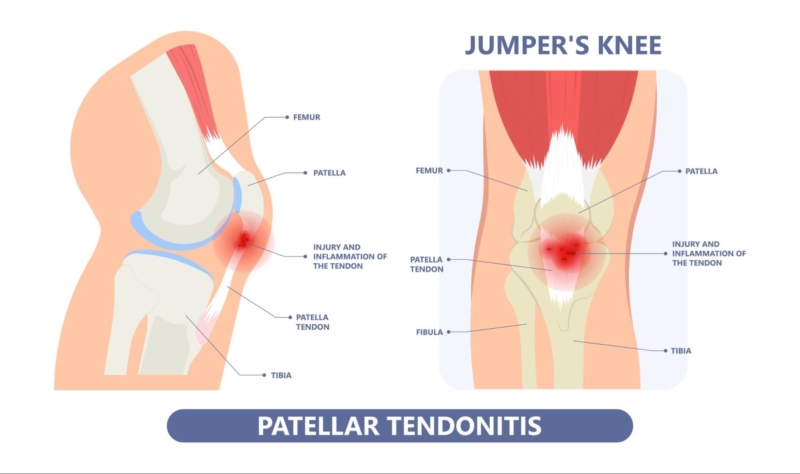
What is patellar tendonitis (Jumper’s knee)?
Jumper’s knee, also known as patellar tendinopathy, is a common condition that plagues athletes and anyone who puts a lot of stress on their knees. It’s caused by overuse of the patellar tendon, the one that connects your kneecap (patella) to your shinbone (tibia).
Causes:
The most common cause of patellar tendonitis is overuse. This can happen if you suddenly increase the intensity or duration of activities that put stress on the patellar tendon, such as jumping, running, or downhill running.
Here are other causes of patellar tendonitis:
- Tightness in the quadriceps or hamstring muscles: These muscles help to support the knee joint. If they are tight, they can pull on the patellar tendon and irritate it.
- Weakness in the quadriceps muscles: The quadriceps muscles help to absorb shock when you land from a jump or run. If they are weak, they may not be able to absorb shock as effectively, which can put more stress on the patellar tendon.
- Muscle imbalances: If the muscles on one side of your leg are stronger than the other, it can put uneven stress on the patellar tendon.
- Improper footwear: Shoes that don’t provide enough support can also contribute to patellar tendonitis.
- Biomechanical problems: Some people have naturally flat feet or knock-knees, which can put more stress on the patellar tendon.
Signs and symptoms:
Here are the most common symptoms of patellar tendonitis:
- Pain and tenderness around your kneecap, especially just below the kneecap
- Swelling around the kneecap
- Pain that worsens with activity, such as jumping, running, or walking uphill or downstairs
- Pain when squatting or kneeling
- Pain when bending or straightening your knee
- A popping or creaking sensation in your knee
- Weakness in your knee
The pain of patellar tendonitis usually starts gradually and worsens over time. It may be worse in the morning or after sitting for a long period. In some cases, the pain may be so severe that it makes it difficult to participate in activities that involve jumping or running.
Stages of Jumper’s knee
Jumper’s knee typically develops gradually over time due to repetitive stress on the patellar tendon.
There are generally four stages of jumper’s knee, each with progressively worsening symptoms:
Stage 1: Pain only after activity, without any functional limitations. You might feel a dull ache or tenderness behind your kneecap, especially after activities that involve jumping or running.
Stage 2: Pain during and after activity, although you can still participate in your sport or activity without too much difficulty. The pain may be more noticeable during activities that involve jumping or landing.
Stage 3: Pain throughout the day, even at rest, and increasing difficulty performing activities that involve jumping or running. The pain may be sharp or stabbing, and you may notice swelling or tenderness around your kneecap.
Stage 4: Complete rupture of the patellar tendon. This is a serious injury that requires surgery to repair the tendon. Symptoms include a sudden, severe pain in the front of your knee, an inability to extend your knee, and a popping or snapping sensation at the time of injury.
Treatment Options:
The good news is that a jumper’s knee is usually treatable with conservative measures. Here’s what you can do to ease the pain and promote healing:
RICE Method :
The RICE method is a first-line treatment for many soft tissue injuries, including jumper’s knee. It stands for:
- Rest: The most important step is to rest the injured knee. This means stopping the activity that caused the pain and avoiding any activities that aggravate it. You may need to use crutches or a knee brace to help keep your knee immobile.
- Ice: Apply ice to the affected area for 15-20 minutes at a time, several times a day. Wrap the ice pack in a towel to prevent skin irritation.
- Compression: Wrap the knee with an elastic bandage to help reduce swelling. Be sure not to wrap it too tightly, as this can cut off circulation.
- Elevation: Elevate your knee above the level of your heart as much as possible. This will help to reduce swelling.
You can use the RICE method for the first few days after you injure your knee. If the pain does not improve after a few days, or if you experience any other symptoms such as swelling, redness, or bruising, see a doctor.
Rehabilitation:
Rehabilitation for jumper’s knee typically focuses on reducing pain, inflammation, and strengthening the muscles around the knee. Here are some of the most common treatments:
- Rest: This is the most important part of treatment. You’ll need to avoid activities that aggravate your pain, such as jumping and running.
- Ice: Apply ice to your knee for 15-20 minutes at a time, several times a day. Wrap the ice pack in a towel to prevent skin irritation.
- Compression: Wear a compression wrap or sleeve to help reduce swelling.
- Elevation: When you’re sitting or lying down, elevate your knee above your heart to help reduce swelling.
Exercises:
Your doctor or physical therapist will recommend specific exercises to strengthen the muscles that support your knee. These exercises typically focus on the quadriceps, the muscles on the front of your thigh. Here are a few examples:
Straight leg raises:
Straight leg raises can be a beneficial exercise for strengthening the quadriceps muscles, which can help in recovery from jumper’s knee.
How to perform?
Here’s how to perform a straight leg raise:
- Lie on your back on a mat or flat surface with one knee bent and your foot flat on the floor.
- Extend the other leg straight up towards the ceiling, keeping your knee straight and your toes pointed up.
- Squeeze your quad muscle in your extended leg and lift it as high as you comfortably can, without arching your back.
- Hold for a second or two, then slowly lower your leg back down to the starting position.
- Repeat 10-12 times, then switch legs and repeat.
Additional Tips:
Here are some additional tips for performing straight leg raises:
- Keep your core engaged throughout the exercise.
- Don’t swing your leg or use momentum to lift it.
- Breathe normally throughout the exercise.
- If you feel any pain, stop the exercise and consult with a healthcare professional.
Variations:
There are also variations of the straight leg raise that you can try, such as:
- Short arc quad raises: These can be done with a rolled-up towel under your ankle for support.
- Straight leg raises with a weight: Once you can comfortably perform straight leg raises without weight, you can add a weight to increase the challenge. Be sure to start with a light weight and gradually increase it as you get stronger.
Short arc quad sets:
Short arc quad exercises are a great way to strengthen the quadriceps muscles, which are the muscles on the front of your thigh. These muscles are important for knee extension and can be helpful in recovering from jumper’s knee. Jumper’s knee is a condition that causes pain in the patellar tendon, which is the tendon that connects the kneecap to the shinbone.
Types:
There are two main ways to do short arc quad exercises:
- Lying down:Lie on your back with one knee bent and the other leg straight out in front of you. Place a rolled-up towel under your knee for support. Tighten your quad muscle and straighten your leg, keeping your heel down on the ground. Hold for a few seconds and then slowly lower your leg back down. Repeat 10-12 times on each side.
- Sitting: Sit in a chair with your feet flat on the floor. Tighten your quad muscle and straighten your leg out in front of you, keeping your heel down on the ground. Hold for a few seconds and then slowly lower your leg back down. Repeat 10-12 times on each side.
You can do short arc quad exercises 2-3 times a day. It is important to start slowly and gradually increase the number of repetitions as you get stronger. If you experience any pain, stop the exercise and consult with a doctor or physiotherapist.
Additional Tips:
Here are some additional tips for doing short arc quad exercises:
- Keep your back flat and your core engaged throughout the exercise.
- Breathe normally throughout the exercise.
- Do not arch your back or hyperextend your knee.
- If you have any pain, stop the exercise and consult with a doctor or physiotherapist.
Wall squats:
Wall squats can be a helpful exercise for rehabilitation of jumper’s knee, but with some modifications. Here’s why:
Modification:
Regular wall squats can irritate jumper’s knee:
- Jumper’s knee involves inflammation of the patellar tendon, located just below your kneecap.
- Deep squats can put stress on this tendon, potentially worsening pain.
Modified wall squats can be beneficial:
- Shallower squat depth: Instead of a full squat, perform a quarter squat where your thighs are parallel to the ground or slightly higher. This reduces stress on the patellar tendon.
- Isometric holds: Hold the squat position for a set time (10-15 seconds) rather than repeatedly going up and down. This strengthens the muscles around the knee without excessive movement.
How to perform?
Here’s how to perform modified wall squats for jumper’s knee:
- Stand with your back flat against a wall, feet shoulder-width apart, and about a foot away from the wall.
- Slowly slide down the wall until your knees are bent at a 90-degree angle or slightly higher (quarter squat depth). Keep your core engaged and back straight.
- Hold this position for 10-15 seconds, focusing on pushing your knees outwards against the wall.
- Slowly press back up to the starting position.
Important points:
- If you experience any pain during the exercise, stop immediately and consult a healthcare professional.
- A physiotherapist can assess your specific condition and recommend the most appropriate exercises for your recovery.
Quadriceps stretch:
Here’s a great quadriceps stretch to target tight quads that can contribute to jumper’s knee:
Standing Quad Stretch
- Find a sturdy wall or chair for balance.
- Stand tall with one hand on the wall or chair for support.
- Raise the other leg behind you, gently bending your knee.
- Reach down and grab your ankle or foot of the raised leg.
- Pull your heel gently towards your buttocks, feeling a stretch in the front of your thigh (quadriceps) on the raised leg.
- Keep your back straight and avoid arching your lower back.
- Hold this stretch for 15-30 seconds. You should feel a gentle tension, not pain.
- Repeat on the other side.
Additional Tips:
Here are some additional tips:
- Engage your core muscles to maintain proper posture and stability.
- Don’t bounce during the stretch. Hold it smoothly and steadily.
- Breathe normally throughout the stretch.
Modification:
Modification for better balance:
If you find it difficult to balance on one leg, you can perform this stretch with a towel. Loop a towel around your raised foot and hold onto both ends of the towel with your other hand. This will provide extra support and allow you to focus on the stretch.
Ultrasound therapy:
Ultrasound therapy uses sound waves to promote healing.
Ultrasound therapy is a treatment option that has been used for jumper’s knee, a condition that causes pain in the patellar tendon, the tendon that connects the kneecap (patella) to the shinbone (tibia). Ultrasound uses sound waves to create heat deep within the tissues.
Advantages:
The theory behind ultrasound therapy for jumper’s knee is that it can help to:
- Increase blood flow to the area
- Reduce inflammation
- Promote healing
However, there is mixed evidence on how effective ultrasound therapy is for jumper’s knee. Some studies have shown that it can be helpful in reducing pain and improving function, while others have found no significant benefit.
Massage therapy:
Massage therapy can be a helpful component in recovering from jumper’s knee, but it’s important to consult with a healthcare professional before starting any new treatment, especially if you have a severe case. Here’s a general idea of how massage therapy can help with jumper’s knee:
- Improved blood flow: Massage can increase blood flow to the area, which can help to promote healing and reduce inflammation.
- Reduced muscle tension: Tight muscles can put more stress on the patellar tendon, so massage can help to loosen tight muscles and improve flexibility.
- Pain relief: Massage can help to relieve pain by stimulating the body’s natural pain-relieving mechanisms.
Types:
There are a few different types of massage that may be helpful for jumper’s knee, including:
- Sports massage: This type of massage is specifically designed to address the needs of athletes. A sports massage therapist will use a variety of techniques to improve blood flow, reduce muscle tension, and promote healing.
- Myofascial release: This type of massage focuses on releasing tension in the fascia, which is the connective tissue that surrounds muscles. Myofascial release can help to improve flexibility and reduce pain.
- Trigger point therapy: This type of massage focuses on targeting trigger points, which are small knots of muscle that can cause pain. Trigger point therapy can help to relieve pain and improve range of motion.
Additional Tips:
Here are some additional tips for self-massage for jumper’s knee:
- Use a foam roller or tennis ball to massage the quadriceps, hamstrings, and calves.
- Apply gentle pressure and move slowly.
- If you experience any pain, stop the massage.
- You can also perform self-massage by gently rubbing the patellar tendon with your thumb.
How to avoid jumpers knee:
Jumper’s knee, also known as patellar tendonitis, is an overuse injury that can be quite painful. Here are some steps you can take to avoid getting it:
- Warming up and cooling down: Always warm up your muscles with light cardio and dynamic stretches before any activity that involves jumping or running. Likewise, cool down afterwards with static stretches to improve flexibility and prevent tightness.
- Strengthening: Strong quadriceps and hamstrings help take stress off the patellar tendon. There are various exercises you can do to strengthen these muscles, but it’s always best to consult a healthcare professional or physical therapist to design a program specific to you.
- Stretching: Tight quadriceps and hamstrings can pull on the patellar tendon, so incorporating stretches for both muscle groups into your routine is important.
- Supportive footwear: Wearing shoes that fit well and provide good arch support can help distribute stress more evenly across your foot and ankle. Orthotics may also be beneficial.
- Listen to your body: If you feel pain in your knee, especially during activities that involve jumping or running, take a break and rest. Pushing through pain can worsen the injury.
- Gradually increase intensity: If you’re starting a new exercise program or increasing the intensity of your workouts, do so gradually to allow your body to adapt.
By following these tips, you can significantly reduce your risk of developing a jumper’s knee. If you do experience pain, it’s important to see a doctor or physical therapist for proper diagnosis and treatment.
Conclusion
Jumper knee is a common overuse injury that can significantly impact athletic performance and quality of life. By understanding the causes, symptoms, and treatment options for this condition, athletes can take proactive steps to prevent injury and promote long-term knee health. Seeking prompt medical attention and following a comprehensive rehabilitation program are essential for managing the jumper knee effectively and returning to sport safely.
FAQs:
What is the solution for the jumper knee?
Jumper’s knee, also known as patellar tendinitis, is a common overuse injury that causes pain around the kneecap. It’s caused by repeated stress on the patellar tendon, which connects the kneecap (patella) to the shinbone (tibia). This inflammation can be painful and make it difficult to jump, run, or squat.
There is no one-size-fits-all solution for a jumper’s knee, but treatment typically involves a combination of rest, ice, compression, and rehabilitation exercises.
Here are some steps to relieve the jumper’s knee:
- Rest: The most important thing you can do to heal a jumper’s knee is to rest your knee and avoid activities that cause pain. This may mean taking a break from your sport or activity for a few weeks.
- Ice: Apply ice to your knee for 15-20 minutes at a time, several times a day. Wrap the ice pack in a towel to prevent skin irritation.
- Compression: Wear a compression brace or wrap to help reduce swelling and pain.
- Elevation: Elevate your knee above your heart whenever possible to reduce swelling.
If you have a severe jumper’s knee that doesn’t improve with conservative treatment, surgery may be an option. However, surgery is usually only a last resort.
Tips:
Here are some tips to help prevent jumper’s knee:
- Warm up before the activity.
- Stretch regularly.
- Strengthen the muscles around your knee.
- Maintain a healthy weight.
- Wear proper shoes.
- Gradually increase the intensity of your activities.
What is stage 3 of jumper knee?
Stage 3 of jumper’s knee is a more severe stage of the condition where the pain becomes more persistent and can occur both during and after activity. At this stage, the pain can significantly impact a person’s ability to participate in sports or other activities that involve jumping or running.
Characteristics:
Here are some of the characteristics of stage 3 jumper’s knee:
- Pain that is present both during and after activity
- Increased difficulty performing activities that involve jumping or running
- Possible weakness in the quadriceps muscle
If you are experiencing any of these symptoms, it is important to see a doctor or physical therapist to get a diagnosis and treatment plan. Early diagnosis and treatment can help to prevent the condition from worsening and can improve your chances of a full recovery.
With proper treatment, most people with stage 3 jumper’s knee can make a full recovery. However, it is important to be patient and follow your doctor’s or physical therapist’s instructions carefully.
Does the jumper’s knee require surgery?
Jumper’s knee, also known as patellar tendinitis, usually doesn’t require surgery. In most cases, it can be treated successfully with rest, ice, medication, and physical therapy.
Surgery is only considered as a last resort if other treatments haven’t helped and the pain is severe. If surgery is necessary, it’s usually an arthroscopic procedure, which means the surgeon will use a small camera and specialized tools inserted through tiny incisions to remove damaged tissue or repair the tendon. Recovery from surgery can take several months.

I am a highly skilled and experienced content writer with a Doctorate in Therapy degree. With a deep understanding of the human body and a passion for health and wellness. I combines my clinical expertise and writing skills to create valuable and engaging content.
child porn