
Finding time to hit the gym can be challenging in our busy lives. But fear not! You can achieve impressive arm strength and definition right from the comfort of your own home. Whether a fitness enthusiast or a beginner, these effective arm exercises will help you sculpt your biceps, triceps, and shoulders.
In this article, I provide a comprehensive guide to sculpting sleek and strong arms from the comfort of your home.
Why Focus on Arm Workouts?
Focusing on arm workouts is essential for several reasons:
- Functional Strength: Your arms are involved in everyday tasks like lifting, carrying, and pushing. Strengthening them improves your overall functionality.
- Aesthetic Appeal: Toned arms enhance your appearance, especially when wearing sleeveless or short-sleeved clothing.
- Confidence Boost: Feeling strong and capable boosts your self-confidence and encourages an active lifestyle.
- Injury Prevention: Strong arms provide stability and reduce the risk of injuries during physical activities.
How to start exercising for arms?
Getting Started:
- Warm-up: Before diving into the exercises, it’s crucial to warm up your muscles with 5-10 minutes of light cardio, like jumping jacks or jogging in place. This helps prevent injuries.
- Form matters: Focus on proper form over speed or weight. Doing exercises incorrectly can lead to muscle strain or pain.
- Listen to your body: Rest when needed, and don’t push yourself to the point of pain.
25 Home exercises for arms
Triceps dips
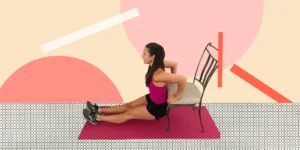
Triceps dips are an effective bodyweight exercise that targets the triceps brachii muscle in the back of your upper arms. Here’s how to perform them correctly:
- Find a Stable Surface:
- Sit on the edge of a stable chair, weight bench, or step.
- Your feet should be hip-width apart, heels touching the ground.
- Place your hands next to your hips, fingers pointing toward your feet.
- Lift Your Body:
- Press into your palms to lift your body off the surface.
- Slide forward just enough so that your behind clears the edge of the chair.
- Lower Yourself:
- Bend your elbows and lower your body until your elbows are between 45 and 90 degrees.
- Control the movement throughout the range of motion.
- Push Back Up:
- Slowly push yourself back up until your arms are almost straight.
- Repeat the movement.
Benefits of Triceps Dips:
- Activates the triceps brachii muscle.
- Engages your core as you hold your hips off the ground.
- Helps with elbow extension and pushing motions in daily activities.
Variations:
- Reduced Range of Motion for Beginners: Limit how far you lower your hips initially and gradually increase the range of motion.
- Triceps Dip with Bent Knees: Bend your knees to reduce stress on the shoulder joints.
- Triceps Dips with Two Chairs: Use two chairs or benches—one for upper body support and the other for lower body support.
Push-ups
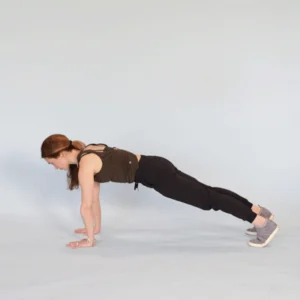
Push-ups are a classic and effective bodyweight exercise that primarily targets your chest, shoulders, and triceps. However, by adjusting your hand positioning, you can engage your biceps more actively during this movement. Let’s explore how to do push-ups correctly and some variations to focus on your arms:
- Standard Push-Up:
- Start in a plank position with your palms on the floor, directly under your shoulders.
- Keep your neck neutral, back straight, core tight, and feet together.
- Bend your elbows to lower your body toward the ground. Your elbows should flare out at a 45-degree angle.
- Maintain a straight torso and neutral neck.
- Push yourself back up to the starting position by extending your arms.
- Pay attention to your lower back—avoid sagging toward the floor.
- Close-Stance Push-Up:
- Bring your hands closer together, leaving just a few inches between them.
- The closer your hands are, the more challenging this exercise becomes.
- Lower your body to the ground, allowing your elbows to flare out at a 45-degree angle.
- Inside Push-Up with Reversed Hands:
- Place your hands close together, but this time, turn them inward so that your fingers point toward each other.
- Perform push-ups with this hand position to emphasize the biceps.
Tips for Proper Form
- Maintain a straight line from head to heels.
- Avoid letting your lower back sag or arch.
- Adjust hand placement based on your comfort and strength level.
- If standard push-ups are challenging, modify them by doing knee push-ups or using an elevated surface like a bench or step.
Remember, consistency and proper form are key to building strength and preventing injuries.
Diamond push-ups
Diamond push-ups are a fantastic variation of the standard push-up that specifically targets your triceps while also engaging your chest and shoulders. Let’s break down how to perform them correctly:
- Set Your Start Position:
- Begin by kneeling on the floor or using an exercise mat.
- Place your hands together so that your index fingers and thumbs touch, forming a diamond shape.
- Your hands should be positioned below your upper chest with straight elbows.
- Maintain a neutral spine and brace your core.
- Lower Yourself to the Ground:
- Initiate the eccentric (lowering) phase by bending your elbows.
- Lower your chest toward the floor while keeping your back flat.
- Ensure that your elbows remain close to your sides throughout the movement.
- Allow your shoulder blades to pinch back as you descend.
- Press Back Up:
- Push yourself back up to the start position by extending your arms.
- Focus on feeling the load through your triceps.
- Keep your torso and legs rigid throughout the entire range of motion.
Common Mistakes to Avoid
- Arching the Back: Maintain a straight line from head to heels. Avoid sagging or arching your lower back.
- Shoulder Position: Keep your shoulder blades pulled back to prevent them from rolling forward.
Variations
- Weighted Diamond Push-Ups: Add a weight plate on your back or wear a weighted vest for extra resistance.
- Handles: While handles are often used for push-ups, they may not be as comfortable for diamond push-ups due to the narrow grip.
Diamond push-ups are a powerful tool for building tricep strength and size.
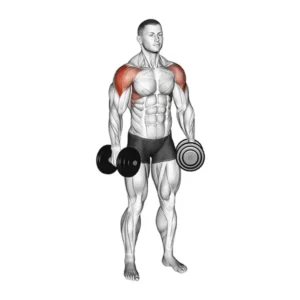
Bicep curls

Bicep curls are a highly recognizable weight-training exercise that primarily targets the muscles of the upper arm, specifically the biceps. Here’s how to perform them correctly:
- Equipment Needed: Dumbbells (or other weight options like kettlebells, barbells, resistance bands, or cable machines).
- Starting Position:
- Stand tall with your feet about hip-width apart.
- Keep your abdominal muscles engaged.
- Hold one dumbbell in each hand, arms relaxed down at the sides of your body, with palms facing forward.
- Your upper arms should remain stable, and your shoulders relaxed.
- Execution:
- Bend at the elbow and lift the weights toward your shoulders.
- Keep your elbows close to your body throughout the movement.
- Exhale while lifting.
- For a full range of motion, raise the dumbbells to your eyes or forehead level.
- Lower the weights back to the starting position.
- Repetitions and Progression:
- Select dumbbells that you can lift 10 times with good form. The last three reps should be very challenging.
- Perform either 8 reps with the same weight or lower the weight slightly and perform 10 reps.
- Gradually increase the weight and/or reps over time to gain muscle and strength.
Benefits
- Consistently performing bicep curls helps you build strength in the upper arm and learn to use your arm muscles correctly, bracing with your core muscles.
- Bicep curls work the biceps muscles at the front of the upper arm and the muscles of the lower arm—the brachialis and brachioradialis.
Common Mistakes to Avoid
- Going Too Fast: Concentrate on proper form rather than rapid execution. Lift the weights with a smooth motion, taking as much time to lower the weight as you do to lift it.
- Improper Elbow Position: Keep your elbows close to the side of your body, and only the lower arm should move until the top end of the movement when your elbows will rise to complete the full range of motion.
Bicep curls are a fundamental exercise for building strength and definition in your arms.
Hammer curls
Hammer curls are a fantastic exercise to target your biceps, brachialis, and brachioradialis muscles.
- Stand Tall: Begin by standing upright while holding a dumbbell in each hand. Keep your wrists straight and squeeze your shoulder blades together.
- Maintain Wrist Rigidity: With your shoulders set, squeeze the dumbbell handles and maintain rigidity in your wrists.
- Curl the Weights: Bend at the elbow to curl the weights up toward your chest without rotating your wrists. Imagine you’re hammering a nail with your fists.
- Top Position: Pause for a moment at the top of the curl, squeezing your arms and ensuring your knuckles are pointed forward.
Coach’s Tip
If you want to strengthen your grip, consider increasing the overall grip diameter of the dumbbell using something like Fat Gripz or even a small towel. This can enhance the muscular activity of your forearm muscles.
Why Do It
Hammer curls not only work your biceps but also strengthen your elbows and wrists. Plus, they give your arms a thicker appearance when viewed from the front.
Variations
- Single-Arm Hammer Curl: Hold a dumbbell in one hand, tuck your upper arm into your torso, and curl the weight up until your arm forms a 90-degree angle with your wrist in a neutral position.
Remember to maintain proper form, and enjoy those serious biceps gains!
Triceps kickbacks
Triceps kickbacks are a fantastic isolation exercise that specifically targets your triceps brachii muscles. These are the muscles on the back of your upper arms. Let’s break down how to perform them correctly:
- Set-Up:
- Stand alongside a weight bench.
- Hinge forward with a light dumbbell in one hand until you’re roughly parallel to the ground.
- Brace your free hand on the weight bench, maintaining a strong hip hinge.
- Row the weight back so that your upper arm is in line with your ribcage.
- Kick Back:
- Slowly extend your arm until it’s fully locked out behind you.
- Squeeze your triceps hard for a second in the fully extended position.
- Make sure your upper arm remains stationary. The movement should come from your elbow, with your forearm doing the actual work.
- You can keep the pinky side of your hand neutral in the top position (facing the ceiling), or twist your hand (keeping your wrist neutral) so that your palm faces the ceiling instead.
- Return to Starting Position:
- Lower the weight back to the starting position with control.
- Maintain an isometric (non-moving) position with your upper arm bent at 90 degrees.
- Slowly start your next repetition.
Coach’s Tips
- Focus on deliberate form even though you’ll be lifting a lightweight.
- If the weight consistently pulls your arm out of position, it might be too heavy.
- Triceps kickbacks are not for maximal strength-building but can help you break through plateaus and build those thick upper arms.
Sets and Reps
- Aim for 2 to 3 sets of 10 to 15 reps.
Consistency and proper form are key to getting the most out of this exercise!
Shoulder Press
The Shoulder Press is a fundamental upper-body exercise that targets the shoulder muscles, helping to build strength and develop well-rounded shoulders. Let’s break down how to perform it correctly:
Dumbbell Shoulder Press (Seated or Standing):
- Setup:
- Begin in a seated or standing position with your feet shoulder-width apart.
- Grasp a dumbbell in each hand, holding it at shoulder level with an overhand grip.
- Brace your core, maintain a neutral spine, and retract your shoulder blades.
- Execution:
- Press the dumbbells over your head from this position until your elbows are fully extended.
- Slowly and with control, lower the dumbbells back to the starting position.
- Repeat for the required number of repetitions.
Muscles Involved
- Deltoid: The main muscle targeted during the Shoulder Press. It lifts the arms overhead (shoulder abduction) and plays a significant role in the pressing motion.
- Triceps Brachii: Assists by extending the elbow joint as you push the weight overhead.
- Trapezius: Helps upward rotate the scapula during the shoulder press exercise.
- Serratus Anterior: Works with the trapezius to upwardly rotate the scapula.
- Rotator Cuff Muscles: Provide stability and maintain proper shoulder joint alignment during movement.
- Upper Pectoralis Major: Contributes to the pressing motion as secondary movers.
Variations
- Machine Shoulder Press: Provides stability and control throughout the movement, making it suitable for beginners or those recovering from an injury.
Remember, proper form is key to maximizing the effectiveness of the Shoulder Press.
Lateral Raise
The Lateral Raise is a fantastic isolation exercise that specifically targets your shoulder muscles, particularly the deltoids. Let’s break down how to perform it correctly:
Setup
- Stand or sit with your feet shoulder-width apart.
- Hold a dumbbell in each hand near your thighs, with your elbows slightly bent.
- Activate your core and maintain an upright posture.
Execution
- Gradually lift your arms to the sides until they are parallel to the floor.
- Imagine you’re forming a “T” shape with your body.
- Once your arms reach shoulder level, raise them up just a little more and squeeze.
- Lower the dumbbells slowly, rotating them slightly downward as you go.
Muscles Worked
- Lateral Deltoids: These are found on the outer side of your shoulders. Their primary function is shoulder joint abduction, allowing you to lift your arms up and out to the side—similar to what you do during lateral raises.
- Anterior Deltoid: The front shoulder muscle is involved in shoulder joint internal rotation, flexion, and horizontal flexion. It’s also activated during pushing exercises like the bench press.
Benefits
- Increases deltoid muscle hypertrophy.
- Improves joint stability and range of motion.
- Creates muscularly rounded shoulders.
Remember to start with a manageable weight, focus on form, and perform repetitions correctly. Lateral raises are a great addition to your shoulder workout routine!
Front Raises

how to perform Front Raises correctly to target your shoulder muscles:
Setup
- Stand with your feet about shoulder-width apart.
- Let your arms hang in front of you with the dumbbells in front of your thighs (palms facing the thighs).
- Keep your back straight, your feet planted flat on the floor, and engage your abdominal muscles.
Execution
- Lift the weights upward while inhaling.
- Your arms should move straight in front of you, away from your body.
- It’s okay to have a slight bend in the elbows, but try to keep the arms as straight as possible.
- With this variation, your palms should face the floor during the entire repetition.
- Continue raising the dumbbells until they reach chin level, or slightly below.
- Pause for a second at the top before lowering the dumbbells back down to the starting position.
Coach’s Tips
- Front raises are an excellent secondary exercise to include after a heavy pressing movement, like the overhead press (OHP).
- If you experience elbow pain during heavy pressing exercises, the front raise may be the best option to train your front deltoids.
Best Equipment to Use for Front Raises
Front raises can be done with various equipment, including:
- Dumbbells
- Cable Machines
- Weight Plates
- Barbells
- Kettlebells
- Resistance Bands
Choose the equipment that suits your gym setup and personal preference.
Plank shoulder taps
Plank shoulder taps are an effective variation of the traditional plank exercise that engages multiple muscle groups, including your arms, core, and shoulders. Let’s break down how to perform them correctly:
Setup
- Begin in a high plank position with your hands directly under your shoulders and your feet hip-width apart.
- Keep your spine neutral, neck and back straight, and hips aligned with your shoulders.
- Engage your core and squeeze your glutes so your body remains flat and stable.
Execution
- Raise your left hand to tap your right shoulder, then set it back down.
- Next, raise your right hand to tap your left shoulder, and set it back down.
- Alternate tapping your left and right shoulders.
- Aim for 15 taps on each side for three rounds.
Muscles Worked
- Biceps: You contract and bend your arm to tap your shoulder.
- Triceps: As you hold yourself up and shift your weight from one arm to the other.
- Obliques: Engaged to prevent excessive rotation of your body.
- Core: Maintains stability throughout the movement.
Form Tips
- Keep your hips level—avoid hiking your butt into the air or dipping your stomach to the floor.
- Maintain hip-width foot placement to prevent rotation or twisting.
- Focus on controlled movements and avoid rushing through the taps.
Plank shoulder taps offer benefits like better posture, less lower back pain, and improved balance. Incorporate them into your routine for a stronger core and toned arms!
Arm circles
Arm circles are an excellent dynamic stretching exercise that can help prepare your upper body for a workout. Let’s dive into how to perform them correctly:
Setup
- Stand straight with your feet shoulder-width apart.
- Extend your arms out to the sides, parallel to the ground.
Execution
- Slowly rotate your arms forward, making small circles of about 1 foot in diameter.
- Keep your elbows straight throughout the movement.
- Continue the circles for the desired number of repetitions.
- You can also perform the circles in the opposite direction (counterclockwise).
Muscles Worked
- Shoulders: Arm circles primarily target the shoulder muscles.
- Upper Arm and Upper Back: They also stimulate these areas.
Benefits of Arm Circles
- Improves Mobility: Arm circles enhance mobility, flexibility, and reach, making them ideal for those with a limited range of motion.
- Lowers Risk of Injury: Proper warm-up with arm circles reduces the risk of injury during intense upper-body training or physical activities.
- Convenient Anywhere: Arm circles are a bodyweight exercise that can be done anywhere—whether you’re standing, sitting, or even in front of your computer.
- Pre-Training Ritual: Use arm circles as part of your dynamic stretching routine before your workout.
Remember to keep the movement controlled and enjoy the benefits of this simple yet effective exercise!
Superman exercise
The Superman exercise targets your lower back, glutes, and hamstrings. Here’s how to do it:
- Lie face-down on the floor with your arms extended in front of you and legs straight.
- Lift your arms, chest, and legs off the floor, engaging your glutes and core.
- Hold for 2–3 seconds, then lower back down.
- Repeat for 2–3 sets of 8–12 reps.
Reverse Snow Angels
To perform Reverse Snow Angels, follow these steps:
Setup
- Lie face-down on a mat or floor.
- Straighten your legs behind you.
- Stretch your arms by your sides with palms facing down.
Execution
- Move your shoulder blades toward each other.
- Raise your arms just above the floor.
- Brace your mid-back and lats.
- Move your outstretched arms toward the front of your head.
Remember to maintain control throughout the movement.
Resistance Band Pull-Aparts
Here’s a concise guide on how to perform Resistance Band Pull-Aparts for your arms:
Setup
- Grab the ends of a resistance band with both hands.
- Hold the band at chest level with your arms straight out in front of you.
Execution
- Spread your arms out to your sides, pulling the band tighter.
- Bring your arms back into the starting position.
Remember to maintain control and focus on engaging your upper back.
Resistance Band Bicep Curls
To perform Resistance Band Bicep Curls, follow these steps:
- Stand with your feet shoulder-width apart, in the middle of the resistance band.
- Hold the handles of the resistance band with your palms facing up.
- Slowly curl your hands up towards your shoulders.
- Squeeze your biceps at the top of the curl.
- Lower your hands back down to the starting position.
Resistance Band Triceps Extensions
To perform Resistance Band Tricep Extensions:
- Stand with one foot slightly in front of the other.
- Place the center of the band under the back foot.
- Bring the handles together straight up above your head.
- Slowly lower the handles behind the back of your head until your elbows are bent 90 degrees, keeping them close to the sides of your head.
- Press your hands back up overhead slowly.
Enjoy strengthening those triceps!
Wall Push-Ups
To perform Wall Push-Ups:
- Stand around an arm’s length from the wall with your feet hip-width apart.
- Place both palms on the wall at around shoulder-level height and shoulder-width apart, with your fingers pointed toward the ceiling.
- Slowly bend your elbows and begin to lean your body toward the wall until your nose almost touches it.
- Slowly push back to the starting position.
Remember to maintain proper form and enjoy strengthening your arms.
Isometric Bicep Holds
To perform Isometric Bicep Holds, follow these steps:
- Stand with your feet shoulder-width apart, knees slightly bent.
- Bend your elbows and curl the weights up until your forearms are parallel to the floor.
- Your palms should be facing upward in a supinated grip, but you can also do this exercise with a neutral grip to work your forearms more (i.e., hammer biceps holds).
- Maintain this position for as long as you can.
Remember to focus on maintaining tension in your biceps during the hold.
Isometric Triceps Holds
To perform Isometric Triceps Holds, follow these steps:
- Stand with your feet shoulder-width apart, knees slightly bent.
- Place the center of the resistance band under the back foot.
- Bring the handles together straight up above your head.
- Slowly lower the handles behind the back of your head until your elbows are bent 90 degrees, keeping them close to the sides of your head.
- Press your hands back up overhead slowly.
Enjoy strengthening those triceps!
Chair Rows
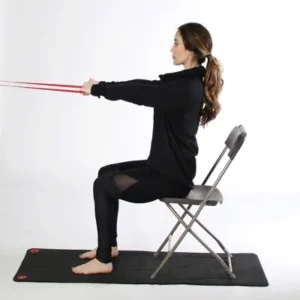
To perform Chair Rows:
- Sit up tall in your chair.
- Extend your arms out in front of you.
- Pull your elbows back behind you, squeezing your shoulder blades together at the end of the movement.
- Keep your chest up throughout the exercise.
- Repeat for the desired number of repetitions
Towel Bicep Curls
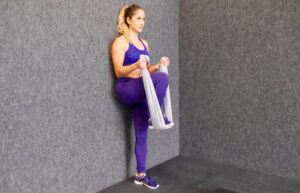
To perform Towel Bicep Curls:
- Stand up straight and lift one leg.
- Place a towel under that leg and hold the ends of the towel in your hands.
- Curl the towel toward your chest by flexing your biceps.
- Keep lifting until your forearms and biceps make contact.
- Hold the contraction for a second and then lower your leg.
Enjoy strengthening those biceps!
Towel Triceps Extensions
To perform Towel Triceps Extensions:
- Stand with one foot slightly in front of the other.
- Place the center of the resistance band under the back foot.
- Bring the handles together straight up above your head.
- Slowly lower the handles behind the back of your head until your elbows are bent 90 degrees, keeping them close to the sides of your head.
- Press your hands back up overhead slowly.
Enjoy strengthening those triceps!
Tabletop Arm Circles
To perform Tabletop Arm Circles:
- Sit up tall in your chair.
- Extend your arms out in front of you.
- Pull your elbows back behind you, squeezing your shoulder blades together at the end of the movement.
- Keep your chest up throughout the exercise.
- Repeat for the desired number of repetitions
Wrist Curls

To perform Wrist Curls:
- Kneel behind a bench or other flat surface.
- Rest your forearms on the bench about shoulder-width apart with your palms facing up.
- Curl your wrists upward as you exhale.
- Extend your wrists downward as far as they will comfortably go on an inhale.
- Return the wrists to a neutral position.
Wrist curls target the muscles in the forearm, improve grip strength, and encourage stronger wrists.
Wrist Extensions
To perform Wrist Extensions:
Setup
- Sit or stand with your forearm supported on a flat surface (such as a table or your thigh).
- Hold a dumbbell or resistance band in your hand with your palm facing down.
Execution
- Bend your wrist upward, lifting the weight.
- Keep your forearm stable and only move at the wrist joint.
- Lower the weight back down to the starting position.
Muscles Worked
- Extensor Carpi Radialis Longus: Helps extend your wrist.
- Extensor Carpi Radialis Brevis: Works with other muscles to extend and abduct your wrist.
- Extensor Carpi Ulnaris: Key for activities requiring a strong grip.
Remember to maintain proper form and control throughout the movement.
Conclusion
Consistency and proper form are key to achieving toned arms with a home exercise plan. By incorporating a variety of exercises that target all major arm muscles, you can sculpt lean and strong arms without ever leaving your living room.

I am a highly skilled and experienced content writer with a Doctorate in Therapy degree. With a deep understanding of the human body and a passion for health and wellness. I combines my clinical expertise and writing skills to create valuable and engaging content.
Pingback: 9 best home exercises for Abs and Core muscles
Thanks for sharing. I read many of your blog posts, cool, your blog is very good.